Knowing how to configure your FTP server behind a NAT server with a dynamic IP address is a common challenge for those who need their server accessible from the outside, but are faced with changing IP addresses and routers with NAT.
In this article, you'll learn how to set up an FTP server with FileZilla Server, enable passive mode, port forwarding, assign a static IP address, and use DDNS to maintain a stable connection from any location.
Why is it difficult to set up an FTP server behind a NAT with a dynamic IP?
One of the main challenges when setting up an FTP server at home or on a corporate network is that we're often behind a NAT router with a dynamic IP address. This complicates external connections, as all devices share a single public IP address, preventing the client from connecting directly to the server.
FTP (File Transfer Protocol) allows files to be transferred between a client and a server. However, since the server is located on a local network, external connections must be properly redirected to reach the correct computer, which requires configuring both the router and the FTP server software.
To understand how this connection works, we must know that the client needs to know the FTP server's IP address. Since this address can change constantly (because it's dynamic) and doesn't point directly to our device, we must rely on specific configurations such as passive mode and port forwarding.
Next, we'll show you how to use FileZilla Server to set up your FTP server and prepare your network so external connections work properly even with a dynamic IP address.
Initial FTP Server Configuration with FileZil
FTP Server Setup with FileZilla Step by Step
Installing Filezilla Server
On our computer we are going to configure the FTP server, for this we use filezilla server. On the Internet you will find more options such as Titan FTP Server, Serv-U FTP Server, among others, but Filezilla is the one that has taken its strongest place.
First we install it in the folder we define, leave the default options and enter an administrator password. Once installed you will find a screen like the following:
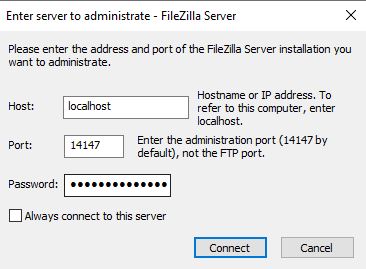
Once FileZilla Server is installed, we access the administration interface with the following settings:
- Host:
localhost(to connect to the same computer – 127.0.0.1) - Port:
14147(default port of the administrative panel) - Password: the one established during installation
Upon entering, you may see some warnings. The most common are:
- “You appear to be behind a NAT router. Please configure the passive mode settings and forward a range of ports in your router.”
- “FTP over TLS is not enabled, users cannot securely log in.”
The first warning is the one we'll address in this article, as it prevents an external client from connecting properly. This situation is common when configuring your FTP server behind a NAT server with a dynamic IP address. We'll address the second warning, related to the lack of FTPS encryption, later.
Set up your FTP behind a NAT without any hassle!
Having trouble with dynamic IP addresses or closed ports? We can help you implement an externally accessible FTP server, even behind NAT.
Configuring Groups in Filezilla
We are going to create a group to which we are going to give access to our FTP server. Just click on the add button, write the name and activate the Enable access for users inside group box.

Filezilla v0.8

Filezilla v1.1
Once created, we must configure which folder we are going to give access to to the users who belong to this group. To do this, we go to the shared folders option in the left menu, select the created group and click on the add button (below directories), there we must select the folder that we want to share via ftp and select the permissions that we are going to give it.

Filezilla v0.8

Filezilla v1.1
Finally, we'll add an extra layer of security to restrict access to our server. We'll only allow access to our client's IP address. In our case, we're configuring an FTP server to perform backups, so we have the client IP addresses fairly well defined. To block all incoming connections, type * and exclude the IP addresses we want to allow in the connection in the following box. Click OK to finish:

Filezilla v0.8

Filezilla v1.1
Creating Users in Filezilla
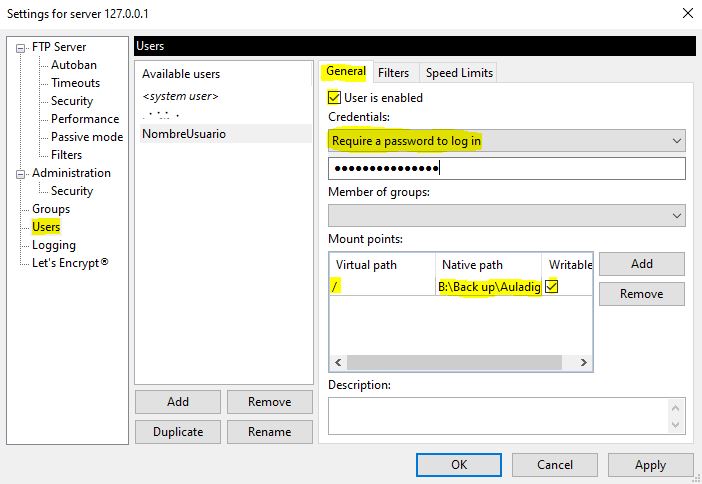
Once the group is created, we'll create the users. Go to the Users section, click Add, enter a name, and select the group it belongs to. Then, enable the account and enter a password. In Filezilla v1.1, it's important to note that folder management has changed slightly. You must select a virtual path; otherwise, you'll receive an error message saying "Virtual path must be absolute." To fix this, simply type "/."

Filezilla v0.8
Filezilla v1.1
Being within an already configured group we do not need to make any further modifications, however FileZilla allows us to make specific configurations per user if desired.
We have already finished the user configuration. Now let's go with our team. As I mentioned at the beginning, we have a NAT router that generates dynamic IP addresses for both our local IP and the network IP. This in addition to having a network IP for all our computers on our local network, as you can imagine, this implies It makes it impossible for our client to connect to our server since the IP to which it connects can be from several different computers on the local network assigned to that IP. Therefore, we must configure passive mode in FileZilla, this will cause our router to receive a FTP request (port 21 by default) and return a series of ports so that the client can connect through one of these at random. To configure this we go to edit>settings and in the menu on the left we will go to passive mode settings:
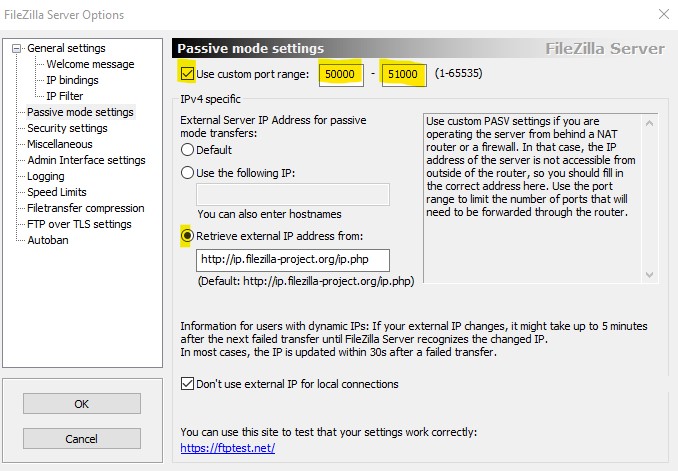
In FileZilla Server, go to Passive Mode Settings and define a port range greater than 1024, as lower ports are reserved for the system. Then, enable the “Retrieve external IP address from” option so the program automatically detects your public IP address, which is essential when setting up your FTP server behind a NAT server with a dynamic IP address.
Next, access your router's dashboard (usually from 192.168.0.1) and go to the Port Forwarding section. There, redirect the ports selected in FileZilla to the local IP of the computer hosting the FTP server. This way, you'll ensure external connections arrive correctly, even with a dynamic IP address.

As you can see, we write the ports described above and direct them to the local IP of our computer. If you do not know what your IP is, open a command line (cmd) and write ipconfig, it is the ipv4 line.

With this we solve the problem of a single IP for our entire local network. The connection would be as follows:
Client connects through the network IP. The router receives it, through a port forward it determines which computer on the local network it should send the communication to with the ports selected in FileZilla.
Finally, we must configure the static (local) IP of our server, with this we ensure that the local IP will not change and the port forward would be sending the communication to an IP that is no longer being used. We must do this configuration on our router:
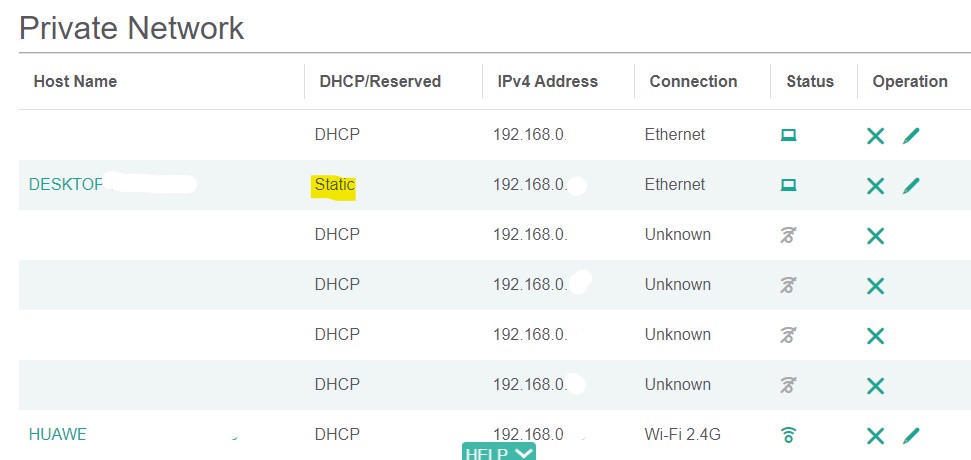
With this, we're done. The next step is to connect through the client. The IP address would be our network IP address—how do I know my network IP address?—the username we created on our FileZilla server, along with its password and port 21 if your client requests it. If everything went correctly, you'll see a screen like this on your FileZilla Server with the connection status:
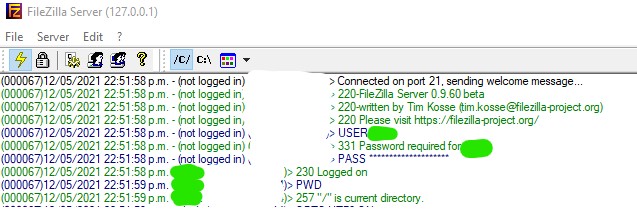
If you get a connection error at this point, the firewall is probably preventing the connection to your computer. To solve this, I invite you to read this article.
We've already tested with our current IP, but what happens when our IP changes? To do this, we must use a dynamic DNS (DDNS) service. If you're unfamiliar with this concept, I invite you to read this article. In short, this service will update our router's IP and assign it to a hostname. Therefore, our client will no longer connect to a specific IP, but to the hostname.
We are going to configure our DDNS, for this there are many services, both paid and free, I recommend you review the options of your router to evaluate if the DDNS service is supported by your router.
Once validated, we must access our DDNS service, create the hostname, and assign it the current IP address. Next, we search for the DDNS option in our router's settings, select our service, and enter the credentials. The router can now connect to our DDNS service and update the IP address to the hostname.

With this we would have configured our Local ftp server.
Boost Your Digital Presence with Comprehensive Solutions!
Now that you know how to configure your FTP server behind a NAT server with a dynamic IP, it's time to take the next step. Agencia RocoWe boost your digital presence with customized SEO strategies, CRM automation, and Google Ads campaigns that truly convert.


